Creating Custom Components
Overview#
In this section, we are going to build the custom components of our Kitty application's front-end.
To recap, these are:
- the
Kitties.jscomponent: this renders KittyCards.js - the
KittyAvatar.jscomponent: this handles the logic that creates an avatar for a Kitty in storage - the
KittyCards.jscomponent: this creates a React<Card/>component to hold Kitty ID, gender, DNA, owner and price
Learning outcomes#
➡️ Use PolkadotJS API to create custom React components.
Steps#
1. Create the Kitties.js component#
This is the component that will get rendered by Apps.js. So it does the heavy lifting, with the help of KittyAvatar.js and KittCards.js.
Start by creating a file called Kitties.js and paste the following imports:
The way our custom components will make use of PolkadotJS API is by using substrate-lib, which is a wrapper around Polkadot JS API instance and allows us to retrieve the API from the PolkadotJS keyring. This is why we use useSubstrate which is exported by src/substrate-lib/SubstrateContext.js and used to create the wrapper.
Then, there's a couple things to set up:
- we'll need a function to help construct the Kitty ID from a storage key
- we'll need a function to hold a Kitty object
- we'll rely on
useEffectfromimport React, { useEffect, useState } from 'react';to listen for changes in our node's storage using React hooks
Proceed by pasting in the following code snippet:
There are two things our app needs to listen for: changes in the amount of Kitties and changes in the Kitty object. To do this we'll create a subscription function for each.
The way we're going to listen for a change in the amount of Kitties is by querying our node using api.query.kitties.kittyCnt, which
queries KittyCnt from our Kitties pallet storage item. Then, we'll use the entries() method from PolkadotJS API to construct a Kitty
ID using the convertToKittyHash function.
Paste the following snippet:
Further Learning
entries() is a Polkadot JS API function that gives us the entire storage map. If there's nothing in storage, it passes in None which acts
as a promise to React hooks. With entries() we get a key and a kitty object.
You can see this in action if you go to the console of your browser running a node Front-end and entering entries. Or get the first Kitty object in storage by doing: entries[0][1].toJSON().
Similarly for subscribeKitties, paste the following code snippet:
Understanding how we retrieve the Kitty Hash#
The PolkadotJS API uses the pallet name and storgae item for the first 64 bits and the unique storage item hash for the remaining 64 bits. We want to get rid of those and only keep the remaining bits which will be our kitty Hash, which is why we use:
And then we use it in the subscription function to get all Kitty IDs:
Clean up functions#
In asyncFetch we're constantly listening to the Kitties storage. This is in relation to using Effects with Cleanup (see [React docs])https://reactjs.org/docs/hooks-effect.html#effects-with-cleanup)). When the component is teared down, it will make sure that all remaining subscription functions are cleaned up:
Now all that's left to do for our component to listen for changes in our node's runtime storgae is to pass in subscribeKittyCnt and
subscribeKitties to React's useEffect function. Hence:
Learn more about how "Effect Hooks" work in React's documentation.
Congratulations! What we've done up until here prepares how the Kitty object and other storage items will be accessible to our React components.
2. Create the KittyAvatar.js component#
In this component, all we're doing is mapping a library of PNG images to the bytes of our Kitty DNA. Since it's mostly all Javascript, we won't be going into much detail.
Create a file in src/ called KittyAvatar.js and paste in the following code:
Notice that the only properties being passed is dna, which will be passed in from KittyCards.js.
The logic in this component is based on a specific "cat avatar generator" library by David Revoy. Download it and paste its contents inside a new folder called
"KittyAvatar" in public/assets/KittyAvatar.
3. Create the TransferModal in KittyCards.js#
Our KittyCards.js component will have three sections to it:
i. TransferModal: a modal that uses the TxButton component.
ii. KittyCard: a card that renders the Kitty avatar using the KittyAvatar.js component as well as all other Kitty information (id, dna, owner, gender and price).
iii. KittyCards: a component that renders a grid for KittyCard (yes, singular!) described above.
As a preliminary step, create a new file called KittyCards.js and add the following imports:
i. Outlining the TransferModal#
Let's outline what the TransferModal will do. Conveniently, the Substrate Front-end Template comes with a component called TxButton which is a useful way to include a transfer button
that interacts with a node. This component will allow us to make an RPC call
into our node and trigger a signed extrinsic for the Kitties pallet.
The way it is built can be broken down into the following pieces:
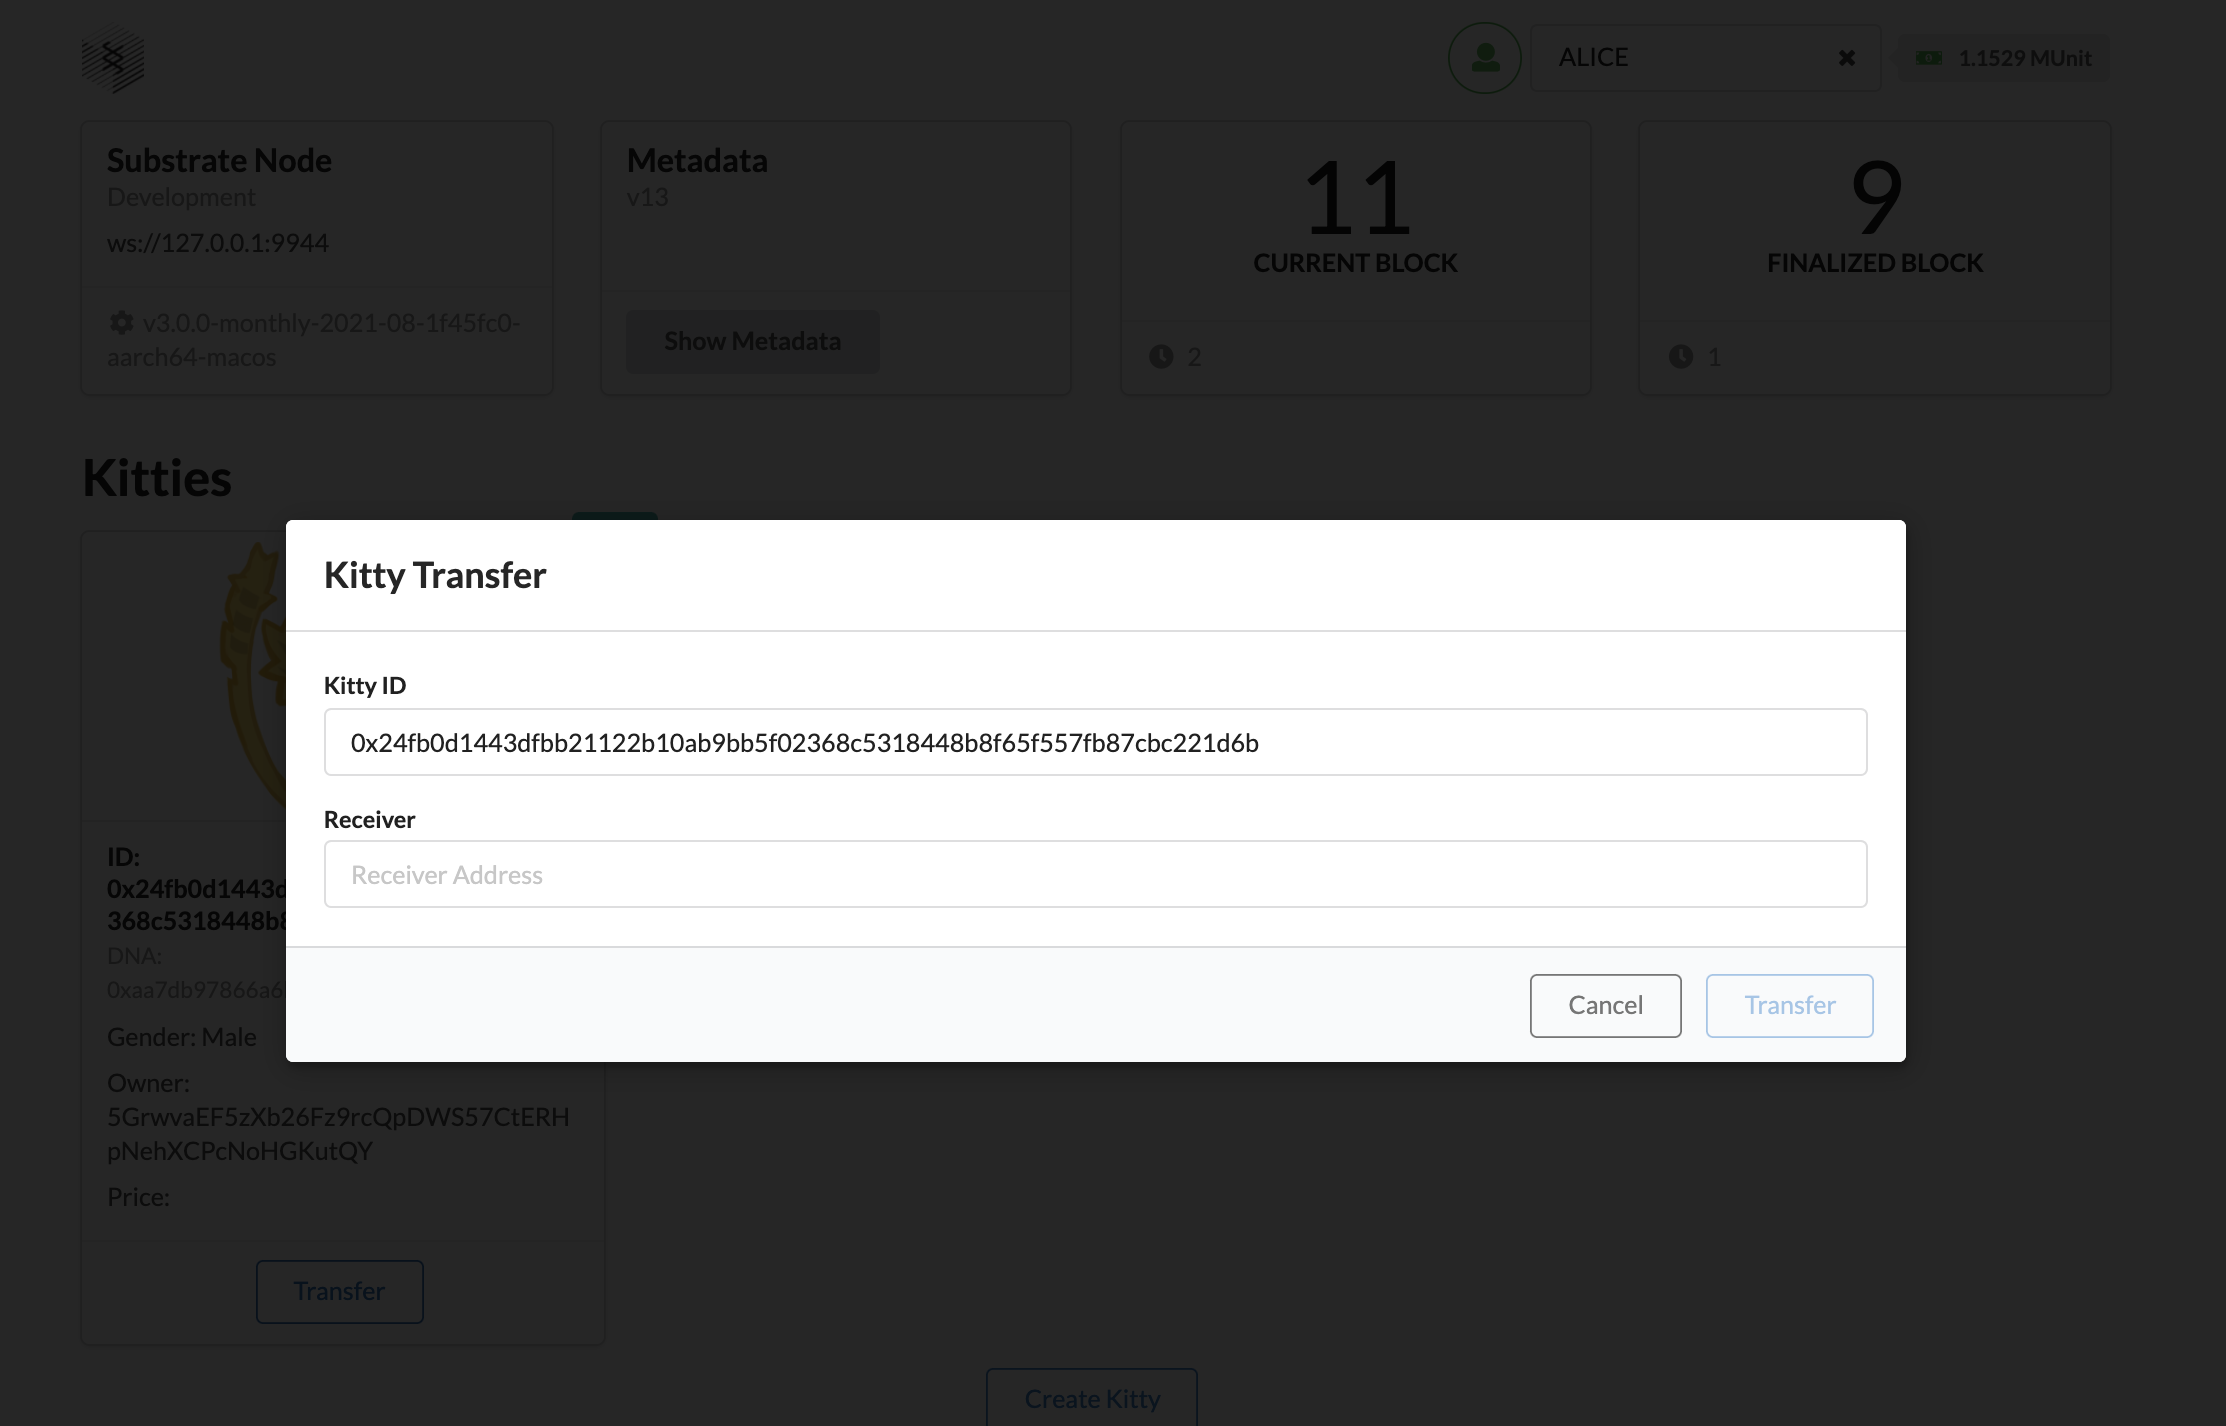
- A "transfer" button exists, which upon being clicked opens up a modal
- This modal, we'll call "Kitty Transfer" is a
Formcontaining (1) the Kitty ID and (2) an input field for a receiving adress - It also contains a "transfer" and "cancel" button
See the screenshot taken below for reference:
ii. Setting up React hooks#
The first thing we'll do is pass in the properties (or "props") we need from kitty, accountPair and setStatus using React hooks. Do this by pasting in the following code snippet:
And now, close the React hook subscription function:
iii. Composing the modal#
To recap: our Kitty Card has a "transfer" button that opens up a modal where a user can choose an address to send their Kitty to. That modal will have:
- a Title
- an input field for a Kitty ID
- an input field for an Account ID
In addition, it will have:
- a "cancel" button which closes the Transfer modal
- the
TxButtonReact component to trigger the transaction
Here's what this looks like in code — paste this in to complete TransferModal and read the comments to follow what each
chunk of code is doing:
The next part of our KittyCards.js component is to create the part that renders the KittyAvatar.js component and the data passed in from the kitties props in Kitty.js.
4. Create the KittyCard in KittyCards.js#
We'll use React's Card component to create a card that render the Kitty avatar as well as the Kitty ID, DNA, gender, owner and price.
As you might have guessed, we'll use React props to pass in data to our KittyCard. Paste the following code snippet, reading through the comments to understand each code snippet:
Now let's make use of the previously imported Card component:
Before closing the <Card/> component we want to render the TransferModal we privously built — only if the Kitty is transferrable by the acitve user account. Paste this code snippet to handle this functionality:
Rendering the card#
It's time to put all the pieces we've built together. In this function, we'll:
- Check whether there's any Kitties to render and render a "No Kitty found here... Create one now!" message if there aren't any
- If there are, render them in a 3 column grid
Have a look at the comments to understand the parts of this code snippet:
And complete the component with:
5. Complete Kitties.js#
Now that we've built all the bits for our front-end application, we can piece everything together.
Go back to the incompleted Kitties.js file and paste this code snippet to render the KittyCard.js component inside a <Grid/>:
Now we'll use the <Form/> component to render our application's TxButton component:
6. Update App.js#
In order to render Kitties.js, we need to as a row item to the <Container/> in App.js:
Congratulations! You've finsished the front-end turorial! Now run yarn start, refresh your browser and you should be able to start interacting with your node.
Next steps#
- Explore the Polkadot JS API cookbook